STeMcell
Specifications
- Microcontroller: STM32F4x1 (commonly STM32F411CEU6)
- Core: ARM Cortex-M4
- Clock Speed: Up to 100MHz (for STM32F411)
- Flash Memory: 512KB (for STM32F411)
- RAM: 128KB (for STM32F411)
- USB: Type-C connector
- Bootloader: Typically DFU (Device Firmware Upgrade) bootloader.
- Form Factor: Pro Micro footprint, designed as a drop-in replacement.
- Common Firmware: QMK
Flashing
Resetting the controller for flashing
You have a few options for putting the STeMcell into flashing mode
- Short RST and GND pins on the controller itself
- Double tap the physical reset switch on the keyboard pcb itself
- Use the QMK reset keycode
Flashing the firmware itself
Given this is using the tinyuf2 bootloader, flashing is VERY simple. When you go into flashing mode, a window will pop up on your machine (like putting a USB drive into your machine). All you need to do is copy the .uf2 file into the root directory, and you're done!
Soldering
STeMcell Jumpers
The first thing you should do is solder the jumpers on the back of the STeMcell, as shown in the image below.
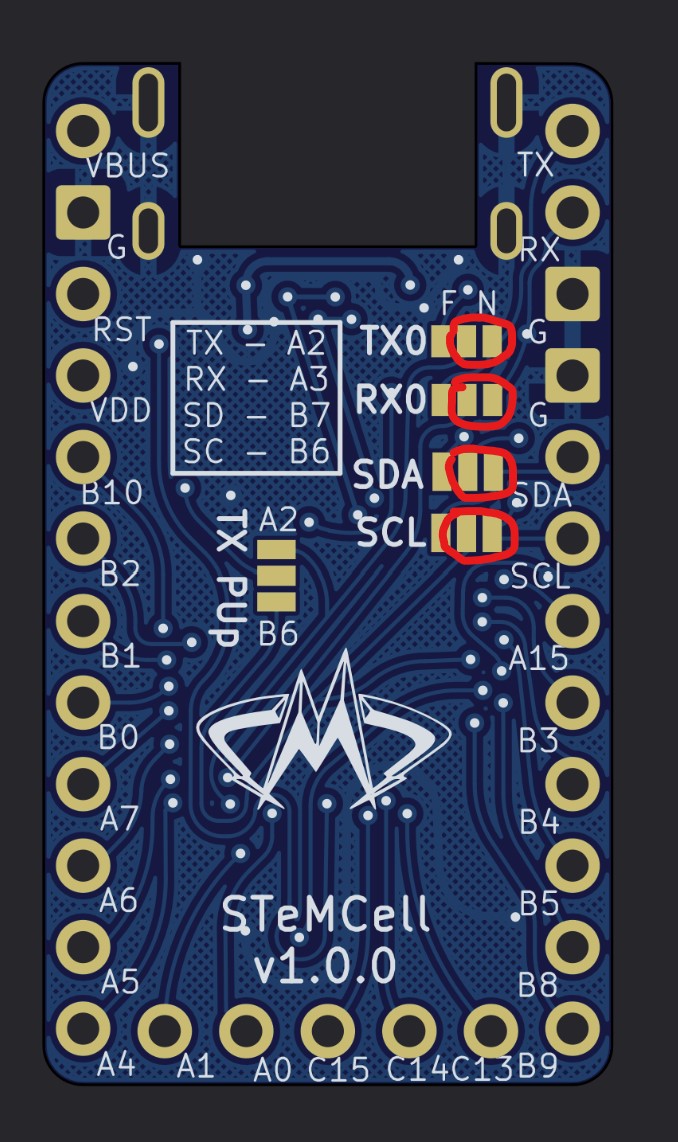
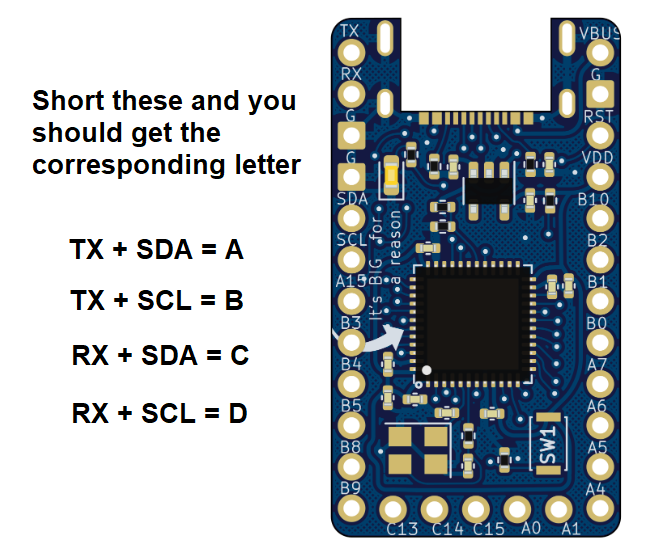
Testing
Before soldering the controller onto your pcb, you may want to test that you soldered the jumpers correctly.
If you are concerned that you may have incorrectly soldered the jumpers on the back of the stemcell, you can use this firmware to test.
Download the testing firmware
- Load it onto your stemcell
- Short the pins shown in the image below
If it outputs what is expected, you did it!
Frequently Asked Questions (FAQ)
This page addresses frequently asked questions regarding the STeMcell Controller.
General Questions
-
What is the STeMcell Controller?
The STeMcell is a Pro Micro footprint compatible keyboard controller based on the STM32F4x1 series microcontroller. It serves as a powerful upgrade or replacement for standard Pro Micros, offering more processing power and memory for feature-rich firmwares like QMK.
-
What firmware is compatible with the STeMcell?
The STeMcell is primarily designed for use with QMK Firmware. Its STM32 chip allows for complex QMK features and larger firmware sizes.
Firmware and Flashing (QMK)
-
How do I flash QMK firmware onto my STeMcell?
Flashing a STeMcell typically involves putting it into DFU (Device Firmware Upgrade) mode:
- Obtain your
.binor.hexfirmware file: Build this using the QMK build environment, configured for your keyboard and the STeMcell's STM32 target (e.g.,STM32F411). - Unplug the STeMcell from your computer.
- Locate the BOOT0 button (or pin, often labeled BOOT) and the RESET button (RST) on the STeMcell.
- Press and hold the BOOT0 button.
- While holding BOOT0, plug the STeMcell into your computer via USB-C. Alternatively, if already plugged in, press and release RESET while holding BOOT0.
- Release the BOOT0 button. The STeMcell should now be in DFU mode.
- Use a DFU programming tool (like
dfu-utilor STM32CubeProgrammer) to flash the firmware file.- Example
dfu-utilcommand:dfu-util -a 0 -s 0x08000000:leave -D your_firmware.bin
- Example
- After flashing, the STeMcell will typically reset and run the new firmware. If not, unplug and replug it.
For general bootloader help, see Entering the Bootloader troubleshooting page.
- Obtain your
-
My computer doesn't recognize the STeMcell in DFU mode.
- Ensure DFU drivers are correctly installed (e.g., using Zadig for Windows for the "STM32 BOOTLOADER" device).
- Verify the BOOT0 and RESET sequence.
- Try a different USB-C data cable and USB port.
- Check for any physical damage or shorts on the STeMcell.
-
My keyboard doesn't work after flashing QMK firmware.
- Confirm you're using the correct firmware file compiled for your keyboard layout and
STM32F411(or the specific STeMcell variant). - Double-check your QMK configuration (
config.h,rules.mk, keymap), especially pin assignments if they differ from a standard Pro Micro. - Try re-flashing the firmware.
- Confirm you're using the correct firmware file compiled for your keyboard layout and
Hardware Issues
-
My STeMcell isn't being recognized by my computer at all.
- Try a different USB-C data cable and port.
- Ensure the STeMcell is properly seated in its socket (if applicable) or that solder joints are good.
- Check for any visible damage on the controller.
-
One or more keys on my keyboard aren't working.
- This is often a hardware issue on the keyboard PCB (diode, switch, trace) or a QMK pin configuration error.
- Since STeMcell is Pro Micro compatible, ensure your QMK configuration uses the standard Pro Micro pins unless your PCB or wiring dictates otherwise.
- Check soldering, diode orientation, and switch functionality.
Layout and Configuration (QMK)
-
How do I configure my keyboard layout with QMK for the STeMcell?
Layout configuration is done via QMK's standard methods (editing
keymap.c,config.h, etc.). As STeMcell is Pro Micro compatible, many existing QMK configurations for Pro Micro-based boards can be adapted by changing the MCU target inrules.mkto an STM32F4xx type. -
Are STeMcell pinouts the same as a Pro Micro?
Yes, the STeMcell is designed to be pin-compatible with the Pro Micro footprint.
Community and Support
-
Where can I get more help with my STeMcell Controller and QMK?
- The QMK Discord server.
- Online keyboard communities like r/olkb.
Always refer to the official QMK documentation and any specific STeMcell documentation provided by the manufacturer or community.